My Tractor Forum banner

Advice on removing engine mount bolts

1 reading
8.3K views 25 replies 9 participants last post by  Sue_S  
#1 ·
I have a Craftsman Garden tractor model 917275021.
https://www.searspartsdirect.com/model-number/917275021/0247/1509200.html
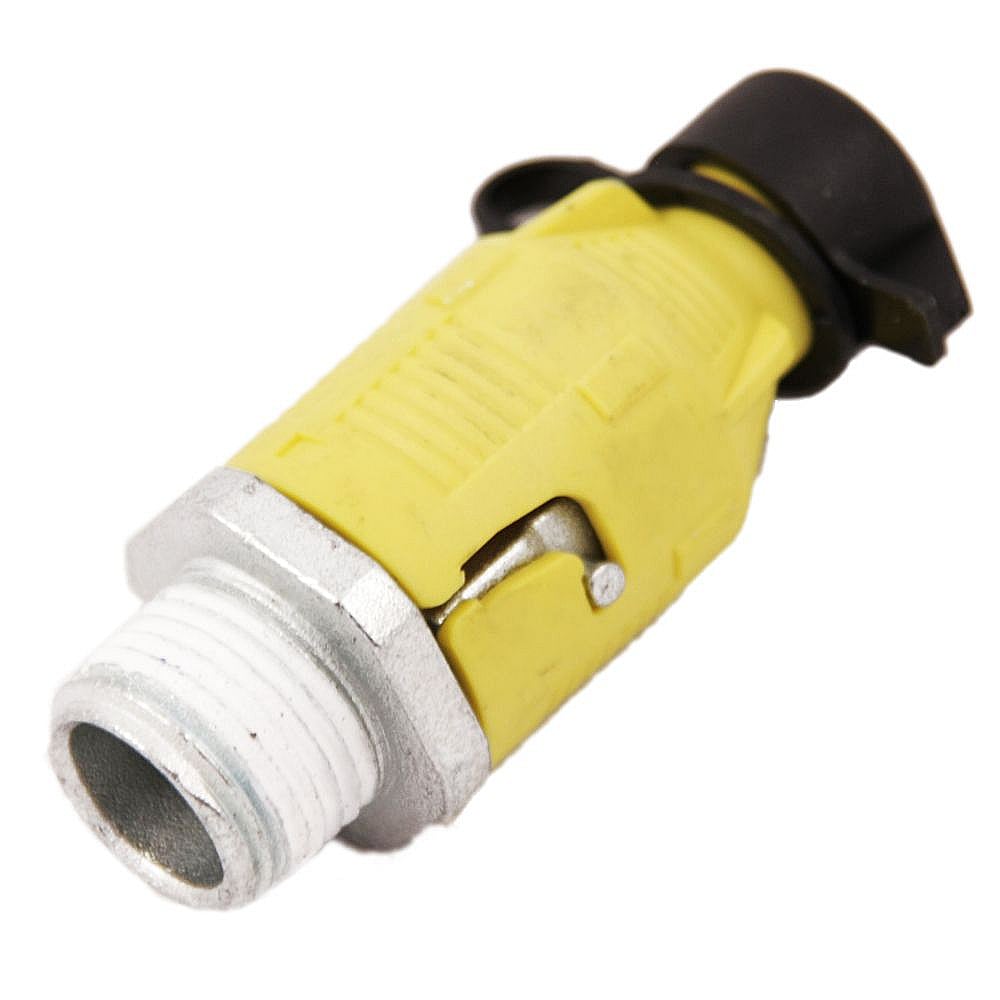
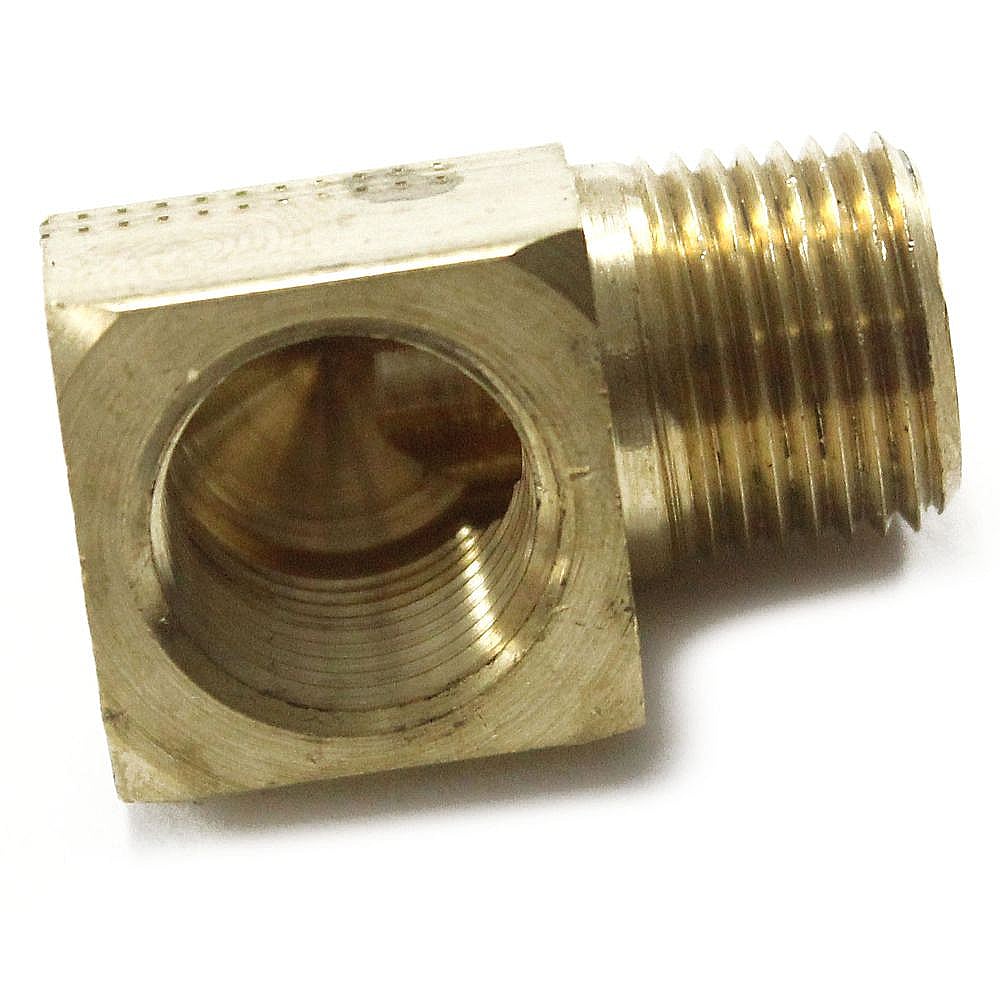
I have to lift the engine in order to remove:

Image


and this:

Image


These keep leaking for me and are very hard to reach to turn. After years of dealing with them, I decided I needed a better way to drain oil so -
I plan to replace them with two 3/8 pipe nipples, 1 elbow and a cap so that I can making draining the oil a much easier task.
(These parts are located in such a position that it is extremely difficult to get my hand in there to turn the plastic sleeve to open the drain.)

I did manage to get the oil drain valve part off from underneath using vice grip pliers.
Unfortunately I cannot get a wrench or any kind of gripping tool in there to turn the brass oil drain elbow out of the engine.
Why I have to lift the engine to reach it. This is what others have done according to SearsPartsDirect.

Problem: I managed to get 3 of the 4 engine mount bolts out. The 4th is in a very hard to reach place. I tried using a 9/16 socket on a breaker bar with an extention. Not enough strength to get it loose. I am soaking the bolt with PB BLaster (so far 3 days). Still no luck. I can't get a wrench directly on the head of the bolt because I can't get up in there to work on it with my hands on the tool.

I ordered a Bernzomatic Torch to try heating.
Advice needed on how to safely use that torch on an engine.

Should I heat the bolt by the enginge block which is aluminum or try heat on the metal part that the bolt screws into to reach the engine block from underneath?

Any advice appreciated. Keep in mind I myself am a women that weigh 114 lbs. without much brute strength.
Thanks in advance!
 
#6 · (Edited)
Be careful when using an open flame around a carburetor with a float bowl full of fuel. I don't know which bolt is where relative to the carburetor so make the comment blindly.
A tool(item?) that will increase your leverage when trying to loosen a bolt is a length of pipe that will fit over the handle of your ratchet wrench. If you are using a box/open wrench, you can entangle a box onto the 'open' end of the wrench, and position it to sit squarely and act as an extension. Generally, a size larger than the one on the fastener will work. Flip the box so it is over one of the open 'fingers', and it should grab. If not, flip the box over so the other angle is engaged.
The heat will expand the aluminum of the block more than the Fe of the fastener, though it will be transferred quickly to other parts of the block, and cool down quickly. Sometimes just the shock of a quick temperature change will loosen the bonds.
If the brass elbow is not leaking, you should be able to use it without changing out for an iron pipe elbow. I figure you plan in using a 'street elbow' or street ell screwed into the sump, and pipe screwed into that. I would use teflon tape, several turns, wrapped around the pipe threads clockwise when looking into the fitting/pipe. That way, when you turn and tighten the fitting, the tape will want to 'go along' with the motion rather than try to un-thread itself.
tom
added:
Please avoid the temptation to over-tighten when installing into the sump. The aluminum can crack more readily than the iron pipe, and so cannot handle being over-torqued. Thread it in by hand until you feel some resistance, hard to turn by hand, then tighten using a pipe wrench, with effort at the end of a 12" equivalent length handle in the 15-20 foot pound range. i.e., a 12" wrench pull at about 15-20 pounds, with a 24" wrench, pull at half that force. You can generally feel when the threads are starting to get 'metal tight' rather than 'tape tight', and you limit your turns after reaching that point, so you get the elbow pointing in the desired direction. That is one reason to use a straight length coming from the sump, and adding elbows further down the path, where you can be Fe-to-Fe, which will accept a lot more over-tightening, and if something breaks, cheap to replace. The straight length does not have to be tight AND lined up. The elbows do.
tom
 
#7 ·
Hi tomw0 :howdy:
That's a wealth of information. :tango_face_smile::thThumbsU
Thanks for sharing. Much appreciated!

I was very concerned about this being an engine mount bolt and its right front above the tie rod. Kind of close to the carburator. I have to use an extender to reach it with the socket. Can't get any tools or my hands up in there to try anything else the way the bolt is situated.

I spent several hours yesterday cleaning off all the leaked oil everywhere I could reach it.
My torch arrived yesterday. But I was hesitant to just go out there and end up torching the whole gt tractor in case I set it on fire or cause gas vapors to explode.

I do have a breaker bar and I did try the cheater bar on it but to no effect (several days, several times). I have used that to remove mower spindle bolts and does work like a charm.
However, at the time, I was using a 12 point socket so decided to wait until the 6 point socket I ordered arrives ( today, yeah!)
Don't want to round off the bolt head.

Meanwhile while I was cleaning the oil and dirt, I decided to clean the air filter and discovered a breather tube had cracked too. Luckily I had a part replacement on hand. That cracket breather tube really added to the oil, dust, dirt mess on its own.
So today after the 6 point socket gets delivered I will give the breaker plus cheater bar socket another try.

If that does not work I will try the torch, very carefully.

I am wondering if I were to use my new Makita hammer, driver, drill with an impact socket if that would be okay to try.
If I can get it in there. Never had a nice drill like that before so I really do not know how safe that would be.
I suspect I could end up with a wrist injury of some sort as I am not very strong. I have to learn about using the correct settings on it yet.
All I had before was an old DeWalt corded electric drill.

Thanks again! :thanku:
 
#8 ·
You sound like one determined woman...that hammer driver is just the tool for this task if you can get it on there...get some extensions if you don't have them...far safer than using a torch...I know heat works, but I always try to avoid it...I have seen a lot of fires cause by using flame to try to loosen something...good luck
 
#10 ·
Last time I tried taking an engine off a newer push mower (A Briggs & Stratton),two out of three of the bolts snapped off in the engine block..

They were very hardened steel bolts,that had a slot cut into the threads,I assume so they cut their own threads like a tap,in the engine block hole,which is aluminum or some similar alloy..

I spent the better part of an afternoon trying to drill the remains of those bolts out--all my drills just screeched and whistled and refused to cut into them--I had to go buy some new cobalt drill bits and a masonry drill bit ,and that masonry bit was the one that finally started cutting away into the bolt...it was tough to keep the drill centered on the bolt,it kept wanting to drift off into the softer engine block...one hole ended up looking like a figure 8 when I was done,I still had part of the bolt stuck in there,with another hole right next to it..had to slot out the mower deck to get a new bolt to go in..and I broke off two of the three 3/16" cobalt bits trying to drill the bolt "on center"--they slid off and snagged on the bolt's area that had been slotted to make it self tapping..

I hope her tractor doesn't have that kind of bolts..they seem to be "one way bolts"--they screw in once and cut their own threads,but may never come back out again..another bright idea some Briggs "engineer" must have dreamed up to save 10 cents ..:(
 
#11 ·
If you could suspend the engine so the broken bolt part of block is submerged in a pan then you put it so pan is on a camp stove. Fill the pan with a water alum mix and heat it with stove. Eventually the steel bolt will dissolve leaving aluminum unchanged. It did with a sump bolt broken the block of tecumseh vtwin. Unfortunately I had already messed the hole from trying to drill it out so after the alum got remainder of bolt I still drilled and tapped oversize. In hindsight maybe I should have tried a helicoil.
 
#12 · (Edited)
You say you have three of them out. Like tractorholic says I've twisted them Briggs engine mounting bolts off also. I've tried severe heat on the stuck ones before and they still twisted off and no good, the steel and aluminum is usually galled together. I have a air chisel rigged with a blunt mushroom head attachment and a air regulator right at on the tool and set the blunt tool on the head of the bolts and set the air pressure so as the hammer impact just buzzes (lime a wood bee) and it break the thread corrosion and they come right out usually. I use the tool quite often on seized exhaust manifold bolts.

I go at them with a real good 6 point box end wrench or a 6 point socket so no rounding off of the head.

If only one twists off the engine (on a craftsman lawn tractor with a Briggs) I see your engine is the Kohler and those engines are balanced good and I would not sweat if only ONE twisted off. Appears the bolts threads are metric instead of standard. it will not vib if the other 3 bolts are bolted down snug. I usually use anti sieze when going back and sometimes I replace them (the ones that have room when they go all the way through and the ends of the threads exposed) with a grade 5 longer bolt with antisieze and a locknut on top. If you cannot get locknut on top just use a lockwasher on the bottom of a grade 5 bolt or a lockwasher on your existing bolts. You might have to get a big husky Bubba to apply torque with a real good 6 point.

They do twist off easily.
 
#13 ·
I just noticed that I have a recent Craftsman GT5000 that has that Kohler engine and it has the same issue as yours,:tango_face_surprise oil leaks out that oil drain and it's hard to get at is why I have not flogged it yet. Was dreading flogging it but the frame on the mower is getting nasty again. May just plug the drain fitting and use a 12v engine sump pump to change the oil in the future. No use in installing the same type plastic wimpy drain.:tango_face_sad:
 
#14 ·
I think the bolts in question are 'tri lobular', with a triangular shape. The tips of the triangles cut threads in the aluminum of the pan as they are installed. The bolts will generally not come out of their own volition. Similar bolts are used on some spindle housings to fasten them to the mower deck. It is a 'assembly' feature in that the threads don't need to be started, just insert the bolt, and pull the trigger.
If you get replacement spindle housings, IMO it is a good idea to get those that have already installed bolts or have threaded the housing rather than cut them as you install.
tom
 
#17 ·
I think the bolts in question are 'tri lobular', with a triangular shape. The tips of the triangles cut threads in the aluminum of the pan as they are installed. The bolts will generally not come out of their own volition. Similar bolts are used on some spindle housings to fasten them to the mower deck. It is a 'assembly' feature in that the threads don't need to be started, just insert the bolt, and pull the trigger.
If you get replacement spindle housings, IMO it is a good idea to get those that have already installed bolts or have threaded the housing rather than cut them as you install.
tom
I suspect a assembly line robot installs them and they do not require a lockwasher. I get a heads up when I see those self tappers going into aluminum. knowing that most likely at least one is going to twist off and it's usually the last one that needs to be removed and being extra gentle and trying not to twist it off..:tango_face_sad:
 
#16 ·
That is what I'm thinking about doing to this rig next time oil needs changed. I have a 12v oil sump pump that I can rig a small hose onto to go down the oil fill spout for changing oil in future so as don't have to even fight the oil drain plug.


I do this with a Honda lawn mower engine (vertical shaft) that does not even have a drain plug.:tango_face_surprise

Owners manual says to turn the engine upside down to drain the oil. They save a nickel by not installing a drain plug.:tango_face_surprise:tango_face_sad:
 
#19 ·
STUBBORN ENGINE BOLT Conclusion:
So after about a week of PB BLaster applications, tapping with a hammer, torch heat and cool several times, trying a 6 point socket with a breaker bar plus cheater bar added to it, the stubborn engine bolt came off - using that setup. Interesting that the bolt head was in good shape as were the threads. No damage at all.
THEN

1. Jacked up the engine with some small blocks of wood. (Used a pry bar to lift it for the block placement).
2. Cleaned all the leaked oil mess off the and around the engine wherever I could get to it.
3. Removed the offending leaking oil drain valve and the brass fitting too. So easy after getting the engine above the frame to use tools on them.
4. Replaced those (3.) with 3/8" 4" long black pipe nipple, 1 black pipe elbow, another 3/8" 4 " long black pipe nipple ,a cap.
(Used tape on threads)
First nipple horizontal leaving engine block oil opening over the frame,
then the elbow,
second nipple down the outside of the tractor frame vertically,
then the end cap on that.
5. Lowered engine only to find the nipple resting on the frame would not let the enging go completely down.:tango_face_sad:
6. Removed my pipe assembly.:tango_face_crying:
7. Ground down the frame with a 1/2" diameter tungsten carbide drum bit where the drain pipe assembly rested on the gt frame.:fing32:
8. Put the drain pipe assembly back on. (Used new tape on threads.)
9. Lowered enging again. Eureka engine dropped down all the way. Pipe rested nicely in the ground slot.:thThumbsU
10. Put back the 4 engine bolts.
11. Changed the oil filter.
12. Added oil.
13 DONE!
EASY OIL draining from now on!
Only one problem left - Grass still grows and still needs periodic mowing.:tango_face_wink:

Thanks! to everyone who commented on this thread! Appreciate all the input!:thThumbsU
 
#21 ·
Will there be photographic evidence of this success? It should be demonstrated so others can see how it worked out. Would getting a longer length of pipe from the sump to the corner of the frame/chassis have allowed adding the elbow without having to grind a relief?
tom
 
#23 ·
Yes,
I will post photos of the finished oil drain set up. Also of all the tools I used.
I never thought to take photos along the way as I was busy trying to figure out what to do next.

Right now I have to mow on the highest setting, then mow again a little shorter then mow again regular height. Else I would have to hay instead of mow lawn.

Busy this week replacing an old metal cemented in frame basement window.
Managed to get the frame out with a pry bar and and some sledge hammering on the frame to bend it and pry it out.
Left now with a big lump of mortar?cement??? to get off the bottom cement blocks of the window opening.
Drilling holes and using wedge and shim set to split what I can manage. Working okay but a slow process with lots of hole drilling.:tango_face_sad:

Photos soon. Promise:tango_face_smile:!
 
#25 ·
Given the composition of the weeds I mow, front and back, I set the deck to the highest position and leave it there all the time. I figure longer blades won't be so 'shocked' when they get whacked, and will leave enough green to keep living no matter that I neither water nor fertilize.(nor bag nor mulch). Works for me.
If you live where there's a HOA, you may have some 'important person' who is 'on the board' come around with a ruler and check your lawn blade length. If so, too bad. I don't generally approve of HOAs and they don't approve of me, so we're even.
tom
 
#26 ·
I like they way you mow tomw0!:thThumbsU
No HOA.
I was thinking to do the same, just keep mowing with the highest setting. It look good after I was done first time out since gt back in order.
Easier on the equipment too.
I live rural, 1 acre to mow. I too have what I call "country lawn", mostly perennial rye with lots of other green plants, lots of white clover.
Side note: I once made dandelion wine one spring. Neighbors though I was crazy out there picking dandelion blossoms. It was delicious!

A couple of years I left the yard behind the house to grow like a field. Lots of pretty wild flowers (aka tall flowering weeds) were blooming.
Guess my neighbor did not approve. He mowed it down without even asking both times.

Now a new neighbor who scalps his lawn offered to mow the lawn but I hired another neighbor, one who thinks like you do about lawn mowing to mow instead while my gt was out of commission. Nothing worse than a scalped country lawn by a former city folk trying to tame the wild yard.

I don't bother trying to kill weeds as where I live behind the lot is a cow pasture and across the road a huge open filed. Wind and birds distribute all kinds of seeds on this lot. Like I said I have "country lawn". It would be a huge waste of both time and money trying to turn the lot into a city lawn. Thanks for you suggestion. I think I shall take it.:tango_face_smile: