My Tractor Forum banner

1971 Sears Custom 8E Carb issue (pics and tons of questions)

9.5K views 20 replies 10 participants last post by  themidniteryder  
#1 ·
My beloved Sears tractor is having carb issues! This is the one that I snow plow with and do all the heavy pulling with it is a 71 Sears Custom 8E with 3 speed HI/LOW. The model number is 917.25580
I have never successful rebuilt a card but I have been told by a million people that the carb is my issue. If I place a brand new spark plug into it and start the engine it will run great from idle until about 1/2 throttle. If you go passed ½ idle to full it will start to back fire out of the exhaust and will foul the plug out in less then 30 seconds. If you are running idle to ½ idle the same scenario will happen but it will take a few minutes. If the plug fouls out from any of the above operation, the tractor will not restart or will start and repeat above very quickly. I can turn it off wait awhile and it will fire back up and idle again for about to a minute or two and sound great at idle. Then it will star to miss and the above scenario.
I know have taken the carburetor off and separated the float and fuel bowl. My biggest problem now is what to do? How do I get a carb repair kit for it? I have no idea who makes the carb, is it a briggs? If it is can anyone determine the model number? There are no markings on it at all except for the word “Choke”. It looks like there is nothing to rebuilt, I guess replace the fuel mixture screws? What would be in a rebuilt kit if I can find one? I am sure as I continue down this I will have a bunch more questions but here are the pictures

Image


Image


Image

Image

Image

Image

Image

Image
 
#4 ·
Is this the main jet (brass looking tube going up and out) and the bolt I need to loosen (Picture below)? When this is placed back together then I would make this one of the last things to put on correct?

Image
 
#3 ·
Yes it's a briggs, use the model and type number on the engine shroud to get parts if needed.

You ever change or clean the points ? Maybe not enough spark ??

There are others that know more then I when it comes to the old briggs. I do have that engine on a tiller, but never had carb trouble with it....yet ??
 
#5 · (Edited)
Yep, unscrew that nut looking thing, and that brass tube will come out. A rebuild kit is easy to find, just like was said, using the numbers stamped on the engine shroud. They're not very expensive, and should include all the parts you took out of your carb. After it's all cleaned up and put back together, you should be able to get it to run just fine.

This might be the kit you need, but check for sure.
http://cgi.ebay.com/BRIGGS-AND-STRA...ZViewItemQQptZBI_Heavy_Equipment_Parts?hash=item3a5291af85&_trksid=p3286.c0.m14

Don't know if you've got them or not, but in case you don't, these two manuals from briggs and stratton have helped me a lot with my engine.
Operator's manual-Carb adjustments are explained on page 5.
http://www.briggsandstratton.com/ma...int_repair/manual_and_more/docmanualdetails.aspx?showpdf=270367-DOMESTIC_LO.pdf
Parts List-shows exploded view of carb
http://www.briggsandstratton.com/ma...on.com/maint_repair/manual_and_more/docmanualdetails.aspx?showpdf=MS5577_LO.pdf
 
#6 ·
I'm impressed that you got the carb apart without pulling the main jet tube. Hopefully you didn't kink it in the process. Definitely pull the tube before reassembling.

My 1977 10/6 has a similar carb setup. Here's the text from the engine manual:

- Finger tighten the idle needle screw (the one at the top of the carb with a spring on the shaft) and re-open 2 1/2 turns.
- Finger tighten the main needle screw (the one at the bottom of the bowl, also with a spring on the shaft) and re-open 1 1/2 turns.
1) Start the engine. Run at full throttle.
2) Turn "High Speed Adjusting Needle" forward or back 1/8 turn at a time until engine runs smoothly. If engine tends to stall when unit is in use, open needle 1/8 turn.
3) Hold throttle lever in idle position.
4) Turn "Idle Adjusting Needle" forward or back 1/8 turn at a time until engine runs smoothly.
5) Allow several seconds between each adjustment for engine carburetor to react to the new setting.


There will be a range of adjustments where it doesn't seem to do much. Find the boundaries (tighten to make lean; open to make rich.) Usually that's about a 1-turn amount. Put the screw in the center of that range.

Note also that you'll need to pay attention to the quality of your fuel. These small engines were designed to run 87 octane leaded "regular." Modern 87 octane unleaded contains detergents, oxygenators, and other additives. It'll vary substantially from one pump to another. If you get an ethanol blended fuel (E5 or E10, both of which are pretty common,) expect to fuss with the high speed needle because the mixture setting will be different
 
#7 ·
That carb is very hard to remove that brass tube from,without damaging the castings threads for the main jet nut ,you MUST use a perfect fitting screwdriver and the brass screw slot in the jet strips very easily too..

I dont see ANY main jet adjusting screw in your carb,even in the first photos before you took the carb off!..unless you removed it,its probably MISSING ,may have unscrewed itself ,or busted off in the main jet "nut"???..if that was "open"too far it'll run way too rich and foul the plug too...but you might have had a leaky float or needle /seat too..
I usually just look for another "Flo-Jet" carb when these act up,I rarely get them apart without ruining the threads that the brass tube goes into,or if I dont ruin it,someone ELSE already did when they were "in there"!...
 
#9 ·
I did remove that screw first before I took my pictures! So that is why you did not see it. I guess in the future I do not have to remove that screw correct? I can just pull off the nut then and the whole thing comes off as one? IF I was to get another "Flo-Jet" carb where would I even begin to find one. I imagine an parts place still sells these? I guess the cheapest way unless I mess up the main jet is just to rebuilt it.

THANKS FOR EVERYONE'S ASSISTANCE WITH THIS! I KNOW MORE QUESTIONS WILL BE COMING. I GUESS OFF TO FIND SOME PARTS AND LOOK AT THESE PDF'S I JUST DOWNLOADED!
 
#10 ·
All the parts you need, and then some, are in the rebuild kits. They cover more than one model, so applications are different, that's why they give you extra parts. Look at the picture of the one on ebay, you'll recognize everything you've pulled off of yours. Just try a can of carb cleaner first, follow the instructions in the owner's manual, and see what happens. It's really easy, actually.
 
#11 ·
I see the rebuilt kit above from EBay above however I was thinking a rebuilt kit would come with a new float also. Is that typical? Would I need one? The kit number from above does not appear to contain a needle and float.
 
#12 · (Edited)
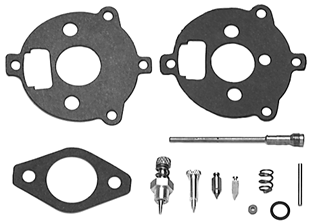
Nope, the kits usually just contain all of the gaskets, jets, and springs that go with them. This is what you can expect to get in a kit.
Image

Floats are usually something you have to order separate. Unless yours has been sitting in a varnished up glob of goo left behind for years, the float should be O.K. It looks O.K. in your pictures, but then, I can't say for sure. I'd try cleaning all of your parts really well first. Shoot carb cleaner over everything, and through all the holes, then blow it all off, and out, with compressed air. Doesn't have to be real high pressure air. Wear some kind of eye protection when you do this. It never fails that the cleaner blows right back into your face! Put it all back together and see how it runs. If noting else, you get practice putting things together when your new carb kit comes if it gets down to that. The carb kit in that ebay sale has all the parts that came in the one I put in my engine. One thing you might do is email them, or somebody else selling such kits, the numbers off of your engine shroud. They should be able to tell you if it would work for your application. Or just google briggs and stratton 291763, or briggs and stratton flo jet carb kit. There's lots of them out there, and prices vary quite a bit. If there's a lawn mower repair shop nearby, who know, maybe they've got one on their shelf.
 
#14 ·
Briggs motors are by far the easiest to find parts for. Although Onan makes great motors, we all know how difficult and pricey it is to find parts for them.. BWD is right. Try cleaning it up first and see if that works. If not, snag yourself a carb kit. I'm sure Briggs stocks floats for your engine. I was able to find floats for a few of my Briggs, Onan and Tecumseh engines at local mower repair shops(if you don't want to wait for the part to come by mail).

I've been learning a lot abot carbs myself recently and it's a process to say the least! I found a repair shop(local) that charges a standard flat rate of $50 to properly clean and diagnose carb problems. Not too bad for someone like me that's still learning. If you provide them with a kit, they'll re-built it and install it at your home for the same price. I seem to learn a bit better by watching someone. That's always an option to consider. Good luck!
 
#15 ·
Thanks! I will be trying thos eideas of this weekend of cleaning and putting back together what I have. I am hoping I can get the nut for the jet loose! It will be good practice. So, I will let everyone know what happens after this weekend! Hopefully good things!
 
#16 ·
Well............. I got it running again without a rebuilt kit! I took it all apart and before I bought the carb kit I sprayed (soaked) everything in carb cleaner. I put it all back together (same gaskets but they appear to work) just to get practice putting it all back together. I did not want to get the kit and mess it up by putting it back together wrong. Well, after following the above directions on the screws it started and runs a lot better!!!!! It will idle and increase speed with a tiny miss. After running at high speed for about a minute then decreased quickly to idle it will make a small backfire. I have not checked the plug yet to see if it was getting black (like what happened in the past). The bottom line is before all of this it would run for less then 2 to 3 minutes. I had this thing running around the yard for about 20 minutes. So hopefully the plug is not getting black again. I will still get a kit but just kind of happy I was able to do it and have it running some what ok. Hopefully plug still looks good just ran out of time!
 
#17 ·
Glad to hear it went well for you. Sort of give you a good feeling when you do all that, and it starts and runs, doesn't it.
 
#18 ·
It is amazing! I still need to check to see if the plug is fouling at all and I gues sif it is it is either more adjustment or to rebuilt it for real!
 
#20 ·
yes the nut actually was not even that tight. The tube appeared to be a bit curved at the end. It was not kincked or creased though. I sprayed carb cleaner with a straw al the way through it without an issue. The only reason I put it all back together without a kit is to make sure I could with out messing anything up. Never dreamed that it would run again! I am pretty happy with it!
 
#21 ·
A quick test to check your float, shake it next to your ear, if you hear liquid sloshing around, get a new one. If it sounds dry then get you a bowl of almost boiling water and submerge your float in it. (A tip from experience, use a spoon to dunk in, not yer finger) If you see tiny bubbles coming up, then the float has a leak, if not, your good. Just like checking a tire tube in a tub of water to find the leak....